Working with jQuery Templates in CoffeeScript is very similar to working with them in JavaScript. However, there are a couple of CoffeeScript features that can make it even easier.
Here's a simple example (based on an example in the jQuery Template documentation):
As you can see, it's pretty similar to its JavaScript counterpart.
How can CoffeeScript make this better?
Enter Heredoc and String Interpolation...
Heredoc: Heredocs allow you to specify multi-line, formatted text. This can be useful when defining the template markup.
With heredocs, the markup from the previous example changes to this:
String Interpolation: CoffeeScript also provides Ruby style string interpolation. Here's an example of the markup after taking advantage of the string interpolation feature (Note: String interpolation only occurs within double-quoted strings and double-quoted heredocs):
Want to see it in action?
Go to http://tinkerbin.com/w0QoscT9, change the JavaScript Format drop down to CoffeeScript, then click the Run button.
Tuesday, September 13, 2011


Sunday, September 11, 2011
WP7 AccelerometerProxy in F#
With the release of the Windows Phone 7.1 SDK RC, there is now an easy way to use the emulator to simulate sensor data (such as data from the accelerometer). Unfortunately, I'm doing WP7 development in a VM and haven't yet had any luck getting the new SDK functionality to work in that environment.
I am however able to run the emulator using the WP7 Developer Tools RTW, but of course that version did not include functionality to simulate sensor data. There are a couple of options that people have identified for simulating accelerometer data (see Example using a mouse, Example using a Wiimote, Example using external app). For my needs, I decided to go with the mouse-driven approach.
While I could have easily used the C# library from the previously mentioned example, I decided instead to port that example to F#. The result is show here:
You can find the full example at https://github.com/dmohl/FsWP7Accelerometer.
I am however able to run the emulator using the WP7 Developer Tools RTW, but of course that version did not include functionality to simulate sensor data. There are a couple of options that people have identified for simulating accelerometer data (see Example using a mouse, Example using a Wiimote, Example using external app). For my needs, I decided to go with the mouse-driven approach.
While I could have easily used the C# library from the previously mentioned example, I decided instead to port that example to F#. The result is show here:
You can find the full example at https://github.com/dmohl/FsWP7Accelerometer.
Tuesday, September 6, 2011
Getting Started with the F# PowerPack - Part 4
In this series, I'm walking you through various features provided by the F# PowerPack.
Here are the links to the previous posts:
- Part 1
- Part 2
- Part 3
In this post, I'll briefly talk about Lexing, Parsing, SI (Metric) Units of Measure, Physical Constants, and Native Array.
Lexing and Parsing:
The FsLex and FsYacc documentation provides a good overview of how to get started with the lexing and parsing functionality offered by the PowerPack. As mentioned in this documentation, Jomo Fisher's Parsed Language Parser Template provides a great place to start from a code point of view. Note: Lexing and Parsing currently require the F# PowerPack to be installed with the MSI rather than with just the NuGet package.
SI (Metric) Units of Measurement:
Units of Measure are available in F# out-of-the-box (see http://cvslab.di.unipi.it/vslab/blog/post/2011/09/05/Ammeter-interface.aspx for a recent example of this feature in use); however, the PowerPack contains several useful predefined units of measure. Chris Smith speaks of the F# PowerPack in his Programming F# book and SI units of measure is one of the highlighted features. Additionally, Andrew Kennedy has a great post on this topic: http://blogs.msdn.com/b/andrewkennedy/archive/2008/09/02/units-of-measure-in-f-part-two-unit-conversions.aspx.
Here's a list of the SI Units that are provided:
Meter (m), Kilogram (kg), Second (s), Ampere (A), Kelvin (K), Mole (mol), Candela (cd), Hertz (Hz), Newton (N), Pascal (Pa), Joule (J), Watt (W), Coulomb (C), Volt (V), Farad (F), Ohm (ohm), Siemens (S), Weber (Wb), Tesla (T), Henry (H), Lumen (lm), Lux (lx), Becquerel (Bq), Gray (Gy), Sievert (Sv), Katal (kat)
PhysicalConstants:
The PowerPack also comes with a few useful predefined physical constants.
Here's the full list (note: these are basically straight from the code comments):
- Speed of light in vacuum
- Magnetic constant
- Electric constant
- Newtonian constant of gravitation
- Planck constant
- Dirac constant (a.k.a. the reduced Planck constant)
- Elementary charge
- Magnetic flux quantum h/2e
- Conductance quantum
- Electron mass
- Proton mass
- Fine-structure constant
- Rydberg constant
- Avogadro constant
- Faraday constant
- Molar gas constant
- Boltzmann constant R/N_A
- Stefan-Boltzmann constant
- Electron volt
- Unified atomic mass unit
NativeArray:
NativeArray.fs provides several modules and types that can be useful when doing native interop.
The NativeOps and Ref modules provide functions for pinning an object.
The types that are defined include PinnedArray, PinnedArray2, NativeArray, and FortranMatrix. There are a few examples of these types in use in the NativeArrayTests.fs file in the FSharp.PowerPack.Unittests project.
Here are the links to the previous posts:
- Part 1
- Part 2
- Part 3
In this post, I'll briefly talk about Lexing, Parsing, SI (Metric) Units of Measure, Physical Constants, and Native Array.
Lexing and Parsing:
The FsLex and FsYacc documentation provides a good overview of how to get started with the lexing and parsing functionality offered by the PowerPack. As mentioned in this documentation, Jomo Fisher's Parsed Language Parser Template provides a great place to start from a code point of view. Note: Lexing and Parsing currently require the F# PowerPack to be installed with the MSI rather than with just the NuGet package.
SI (Metric) Units of Measurement:
Units of Measure are available in F# out-of-the-box (see http://cvslab.di.unipi.it/vslab/blog/post/2011/09/05/Ammeter-interface.aspx for a recent example of this feature in use); however, the PowerPack contains several useful predefined units of measure. Chris Smith speaks of the F# PowerPack in his Programming F# book and SI units of measure is one of the highlighted features. Additionally, Andrew Kennedy has a great post on this topic: http://blogs.msdn.com/b/andrewkennedy/archive/2008/09/02/units-of-measure-in-f-part-two-unit-conversions.aspx.
Here's a list of the SI Units that are provided:
Meter (m), Kilogram (kg), Second (s), Ampere (A), Kelvin (K), Mole (mol), Candela (cd), Hertz (Hz), Newton (N), Pascal (Pa), Joule (J), Watt (W), Coulomb (C), Volt (V), Farad (F), Ohm (ohm), Siemens (S), Weber (Wb), Tesla (T), Henry (H), Lumen (lm), Lux (lx), Becquerel (Bq), Gray (Gy), Sievert (Sv), Katal (kat)
PhysicalConstants:
The PowerPack also comes with a few useful predefined physical constants.
Here's the full list (note: these are basically straight from the code comments):
- Speed of light in vacuum
- Magnetic constant
- Electric constant
- Newtonian constant of gravitation
- Planck constant
- Dirac constant (a.k.a. the reduced Planck constant)
- Elementary charge
- Magnetic flux quantum h/2e
- Conductance quantum
- Electron mass
- Proton mass
- Fine-structure constant
- Rydberg constant
- Avogadro constant
- Faraday constant
- Molar gas constant
- Boltzmann constant R/N_A
- Stefan-Boltzmann constant
- Electron volt
- Unified atomic mass unit
NativeArray:
NativeArray.fs provides several modules and types that can be useful when doing native interop.
The NativeOps and Ref modules provide functions for pinning an object.
The types that are defined include PinnedArray, PinnedArray2, NativeArray, and FortranMatrix. There are a few examples of these types in use in the NativeArrayTests.fs file in the FSharp.PowerPack.Unittests project.
Thursday, September 1, 2011
Unit Testing a jQuery Plugin with CoffeeScript and Pavlov
If you search the web, you'll find a handful of good examples of jQuery plugins written in CoffeeScript, but there seems to be few examples of writing unit tests/specs in CoffeeScript. In this post, I'll show a very simple jQuery plugin with Pavlov specs.
Simple Plugin
This plugin simply wraps the jQuery UI dialog (http://jqueryui.com/demos/dialog/).
QUnit is a JavaScript testing framework (learn more about it at http://docs.jquery.com/Qunit) and Pavlov (https://github.com/mmonteleone/pavlov) extends QUnit with several features that promote Behavior-Driven Development (BDD). Here's the example:
Once we have this in place and create a simple test runner page, we end up with the standard QUnit output that looks like the following:

Simple Plugin
This plugin simply wraps the jQuery UI dialog (http://jqueryui.com/demos/dialog/).
do ($ = jQuery) ->
  methods =
    init: (options) ->
      dialogElement = $(options.dialogSelector)
      dialog = dialogElement.dialog autoOpen: false, modal: true, resizable: false
      $(options.inputSelector).click -> dialog.dialog 'open'

  $.fn.simple = (options) ->
    settings = dialogSelector:'.dialog', inputSelector:'.input'
    if options
      $.extend settings, options
    methods.init settings
Pavlov SpecsQUnit is a JavaScript testing framework (learn more about it at http://docs.jquery.com/Qunit) and Pavlov (https://github.com/mmonteleone/pavlov) extends QUnit with several features that promote Behavior-Driven Development (BDD). Here's the example:
pavlov.specify "Simple Plugin", ->
  describe "Given default options", ->
    before -> $(this).simple()
    describe "when executing a click event", ->
      before -> $('.input').click()
      it "it should open the dialog", ->
        assert($('.dialog').parents('.ui-dialog:visible').length).isTrue()
      after ->
        $('.dialog').dialog('close')
    describe "When the click event has not been executed", ->
      it "it should not have an open dialog", ->
        assert($('.dialog').parents('.ui-dialog:visible').length).isFalse()
      after ->
        $('.dialog').dialog('close')

  describe "Given all custom options", ->
    before ->
      $(this).simple dialogSelector:'.customDialog', inputSelector:'.customInput'
    describe "when executing a click event", ->
      before -> $('.customInput').click()
      it "it should open the custom dialog", ->
        assert($('.customDialog').parents('.ui-dialog:visible').length).isTrue()
      after ->
        $('.customDialog').dialog('close')

  describe "Given only a custom dialogSelector", ->
    before -> $(this).simple dialogSelector:'.customDialog'
    describe "when executing a click event", ->
      before -> $('.input').click()
      it "it should open the custom dialog", ->
        assert($('.customDialog').parents('.ui-dialog:visible').length).isTrue()
      after ->
        $('.customDialog').dialog('close')

  describe "Given only a custom inputSelector", ->
    before -> $(this).simple inputSelector:'.customInput'
    describe "when executing a click event", ->
      before -> $('.customInput').click()
      it "it should open the dialog", ->
        assert($('.dialog').parents('.ui-dialog:visible').length).isTrue()
      after ->
        $('.dialog').dialog('close')
The OutputOnce we have this in place and create a simple test runner page, we end up with the standard QUnit output that looks like the following:

Thursday, August 25, 2011
Adding NuGet Support to F# Interactive
A little over a week ago, Rick Minerich and I had a brief conversation about how cool it would be to install NuGet packages via the F# Interactive (FSI). After some research, there seems to be 3 options for accomplishing this:
1. Write a script that is loaded when the FSI starts.
2. Modify the source of FSI.exe (which can be found at http://fsharppowerpack.codeplex.com/).
3. Create an alternate F# Interactive Window VSIX that starts the FSI.exe as a new process as well as provides new commands.
In this post, I'll explore the first of these options.
Building the Script:
There are 3 steps to accomplishing the desired goal with option 1.
1. Create a F# script that has the ability to retrieve packages from NuGet and interact with Visual Studio. The script that I used to accomplish this can be found here.
Note: NuGet must be installed on the machine. Additionally, you will need to change the path to the NuGet.Core.dll reference if running a 32-bit version of Windows. This will be evident if you receive an error like the following when starting the F# Interactive Window - "error FS0084: Assembly reference 'C:\Program Files (x86)\Microsoft ASP.NET\ASP.NET Web Pages\v1.0\Assemblies\NuGet.Core.dll' was not found or is invalid".
2. Update the FSI command line options in Visual Studio by going to Tools | Options | F# Tools | F# Interactive. Add "--use:<Path>\FsiExtension.fsx" to the "F# Interactive Options" value (see example below). Note: A full list of available FSI options can be found at http://msdn.microsoft.com/en-us/library/dd233172.aspx.

3. Open the F# Interactive Window (or reset the session if the window is already opened).
Taking it for a Test Drive:
Now that you are setup, it's time to try out the new functionality.
1. Create a new F# project and add a F# Script File (if one doesn't currently exist).
2. Add some code (such as the following example from the Getting Started with F# PowerPack - Part 2 blog post) to the F# Script File:
3. In the F# Interactive Window, type InstallPackage "FSPowerPack.Core.Community";; and execute it. This will fire off the process to retrieve the FSPowerPack.Core.Community NuGet package from NuGet Gallery. The F# Interactive Window should look like the following once the process is complete:
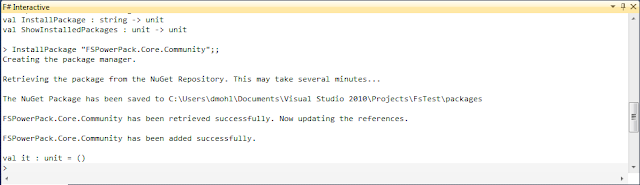
This does two things:
1. It retrieves the specified NuGet package.
2. It adds any appropriate references to the fsx file. Your code will now look something like this:
Conclusion:
While this is hardly a perfect solution, hopefully it will at least spawn a few ideas. This implementation has several known issues (and probably several that are unknown). Let me know if you have ideas on better approaches or improvements.
1. Write a script that is loaded when the FSI starts.
2. Modify the source of FSI.exe (which can be found at http://fsharppowerpack.codeplex.com/).
3. Create an alternate F# Interactive Window VSIX that starts the FSI.exe as a new process as well as provides new commands.
In this post, I'll explore the first of these options.
Building the Script:
There are 3 steps to accomplishing the desired goal with option 1.
1. Create a F# script that has the ability to retrieve packages from NuGet and interact with Visual Studio. The script that I used to accomplish this can be found here.
Note: NuGet must be installed on the machine. Additionally, you will need to change the path to the NuGet.Core.dll reference if running a 32-bit version of Windows. This will be evident if you receive an error like the following when starting the F# Interactive Window - "error FS0084: Assembly reference 'C:\Program Files (x86)\Microsoft ASP.NET\ASP.NET Web Pages\v1.0\Assemblies\NuGet.Core.dll' was not found or is invalid".
2. Update the FSI command line options in Visual Studio by going to Tools | Options | F# Tools | F# Interactive. Add "--use:<Path>\FsiExtension.fsx" to the "F# Interactive Options" value (see example below). Note: A full list of available FSI options can be found at http://msdn.microsoft.com/en-us/library/dd233172.aspx.

3. Open the F# Interactive Window (or reset the session if the window is already opened).
Taking it for a Test Drive:
Now that you are setup, it's time to try out the new functionality.
1. Create a new F# project and add a F# Script File (if one doesn't currently exist).
2. Add some code (such as the following example from the Getting Started with F# PowerPack - Part 2 blog post) to the F# Script File:
open Microsoft.FSharp.Control

let rec job = async {
        for i in 1 .. 20 do
            printfn "doing some work"
            do! Async.Sleep 300
            worker.ReportProgress i
    }
    and worker : AsyncWorker<_> = AsyncWorker(job)

worker.ProgressChanged.Add(fun jobNumber -> printfn "job %d completed" jobNumber)
worker.Error.Add(fun err -> printfn "Error: %A" err.Message)
worker.Completed.Add(fun _ -> printfn "All jobs have completed")
worker.Canceled.Add(fun _ -> printfn "Jobs have been canceled")

worker.RunAsync() |> ignore
3. In the F# Interactive Window, type InstallPackage "FSPowerPack.Core.Community";; and execute it. This will fire off the process to retrieve the FSPowerPack.Core.Community NuGet package from NuGet Gallery. The F# Interactive Window should look like the following once the process is complete:

This does two things:
1. It retrieves the specified NuGet package.
2. It adds any appropriate references to the fsx file. Your code will now look something like this:
#r @"C:\git\TestFsDte\packages\FSPowerPack.Core.Community.2.0.0.0\Lib\Net40\FSharp.PowerPack.dll"
open Microsoft.FSharp.Control

let rec job = async {
        for i in 1 .. 20 do
            printfn "doing some work"
            do! Async.Sleep 300
            worker.ReportProgress i
    }
    and worker : AsyncWorker<_> = AsyncWorker(job)

worker.ProgressChanged.Add(fun jobNumber -> printfn "job %d completed" jobNumber)
worker.Error.Add(fun err -> printfn "Error: %A" err.Message)
worker.Completed.Add(fun _ -> printfn "All jobs have completed")
worker.Canceled.Add(fun _ -> printfn "Jobs have been canceled")

worker.RunAsync() |> ignore
4. You can also see what packages are installed by typing ShowInstalledPackages();;Conclusion:
While this is hardly a perfect solution, hopefully it will at least spawn a few ideas. This implementation has several known issues (and probably several that are unknown). Let me know if you have ideas on better approaches or improvements.
Wednesday, August 24, 2011
Getting Started with the F# PowerPack - Part 3
In this series, I'm walking you through various features provided by the F# PowerPack.
Here are the links to the previous posts:
- Part 1
- Part 2
In this post, I'll discuss HashMultiMap and LazyList.
HashMultiMap:
http://cs.hubfs.net/forums/post/4371.aspx provides a nice description of the HashMultiMap type. Here's an excerpt from that link "HashSet and HashMultiMap are mutable structures, and both are implemented using hash comparison. When inserting a value, structural hash (or a user-supplied hash function) and (=) are used to find if a key already exists. Therefore, these are a good choice when the key is a complex or recursive data structure. HashSet contains keys only, and HashMultiMap contains keys and an associated value. Each key can only appear once in a HashSet or HashMultiMap, but multiple values can be bound to a single key in a HashMultiMap." Note: HashSet is now in System.Core. The version in the F# PowerPack has been deprecated.
Here is an example of HashMultiMap:
Matthew Podwysocki has a nice post on Lazy Evaluation in F# that includes a section on LazyList. Here are a few excerpts from this post that explain the LazyList type. "The LazyList is a list which caches the results of the computed results on the items inside the collection." "The values aren't computed until the first is accessed, and then the results are cached."
The following contrived example shows the LazyList in use:
That's it for today. You can find these examples (and several others) on my GitHub: https://github.com/dmohl/FSharpPowerPackExample.
Here are the links to the previous posts:
- Part 1
- Part 2
In this post, I'll discuss HashMultiMap and LazyList.
HashMultiMap:
http://cs.hubfs.net/forums/post/4371.aspx provides a nice description of the HashMultiMap type. Here's an excerpt from that link "HashSet and HashMultiMap are mutable structures, and both are implemented using hash comparison. When inserting a value, structural hash (or a user-supplied hash function) and (=) are used to find if a key already exists. Therefore, these are a good choice when the key is a complex or recursive data structure. HashSet contains keys only, and HashMultiMap contains keys and an associated value. Each key can only appear once in a HashSet or HashMultiMap, but multiple values can be bound to a single key in a HashMultiMap." Note: HashSet is now in System.Core. The version in the F# PowerPack has been deprecated.
Here is an example of HashMultiMap:
let hashSeq =
    seq { for i in 1..100 do
            yield ("key" + i.ToString()), ("value" + i.ToString())}
let hashMultiMap = HashMultiMap<string, string>(hashSeq, HashIdentity.Structural)

printfn "The value from the HashMultiMap for key:key5 is %s" (hashMultiMap.Item "key5")
LazyList:Matthew Podwysocki has a nice post on Lazy Evaluation in F# that includes a section on LazyList. Here are a few excerpts from this post that explain the LazyList type. "The LazyList is a list which caches the results of the computed results on the items inside the collection." "The values aren't computed until the first is accessed, and then the results are cached."
The following contrived example shows the LazyList in use:
seq { for i in 1..10 do yield ("value" + i.ToString())}
|> LazyList.ofSeq
|> LazyList.iter(fun v -> printfn "The value from the LazyList is %s" v)
Wrapping Up:That's it for today. You can find these examples (and several others) on my GitHub: https://github.com/dmohl/FSharpPowerPackExample.
Saturday, August 20, 2011
DevLink: Getting Started with F# Web Development
Thanks to all who attending the Getting Started with F# Web Development session at DevLink. The conference was excellent once again and I greatly enjoyed meeting each of you!
For those interested, the slides and code samples from this talk can be found at https://github.com/dmohl/GettingStartedWithWebDevInFSharpPresentation.
For those interested, the slides and code samples from this talk can be found at https://github.com/dmohl/GettingStartedWithWebDevInFSharpPresentation.
Subscribe to:
Posts (Atom)