Tuesday, May 24, 2011

Getting Started with FSRepository 2.0

FSRepository 2.0 is now available in the NuGet gallery. This version references EF 4.1, fixes an issue, and attempts to provide a more intuitive example.

Getting Started:

It's easy to get started with FSRepository 2.0.

1. Create a new F# Application (this example uses a project named TestFSRepository).
2. Follow the instructions defined in http://bloggemdano.blogspot.com/2011/01/fsrepository-new-nuget-package.html to install the FSRepository package.
3. Move the FSRepository.fs file above the Program.fs file (see http://lorgonblog.wordpress.com/2008/08/03/sneak-peeks-into-the-f-project-system-part-three/ for information on how to do this).
4. Add the following code to Program.fs and you're done.

open TestFSRepository.Repositories

type Program() = 
    static member Run() =
        use sampleRepository = new SampleRepository()
        let sample = new ASample()
        sample.Id <- 1
        sample.CreatedBy <- "Dan"
        do sampleRepository.Add sample
        do sampleRepository.Save()
        sampleRepository.GetAll()
        |> Seq.iter (fun (sample:ASample) -> 
                   (printfn "Sample Id = %A" sample.Id |> ignore))

Program.Run()

Tuesday, April 19, 2011

Today's Presentation for the Community for F#

Thanks to all who joined the Community for F# Live Meeting today. The people that make up the F# community are truly the best around! A big thanks also goes out to Ryan for putting all of this together month after month!

As mentioned during the presentation, here is the slide deck (plus the slide that I somehow deleted before the presentation), links to the samples that were shown, as well as a link to the Live Meeting video:

Video:


Slide Deck:
Examples:

VSIX Multi-Project Template: https://github.com/dmohl/FSharpWP7BasicTemplate
IWizard Implementation: https://github.com/dmohl/FSharpMVC3Starter
NuGet Package: https://github.com/dmohl/FSPowerPack.Community

Tuesday, March 29, 2011

Extending a F# Project Template with a Template Wizard

A little background:

One of the issues that I experienced early on when building the various F# templates that are available on Visual Studio Gallery, was that of invalid references between some of the projects that made up the multi-project templates. This is because the act of creating a new project from an installed template always causes new project GUIDs to be created. Since the project references are tied to the GUIDs of the projects that existed when the multi-project template was developed, the references were being marked as suspect. This didn't really cause errors; however, it did cause an unsightly warning icon:

It was quickly discovered that the best approach for accomplishing the association of projects within the multi-project template was to create a custom template wizard. This post will show how to create one of these custom template wizards using an example similar to the code which was developed for the F# and C# ASP.NET MVC 3 template.

Follow these simple steps:

1. Create a new F# project and add a class that implement IWizard and uses the standard DTE commands to add each project as a reference. An example is shown below:

namespace FSharpMVC3TemplateWizard

open System
open System.Collections.Generic
open System.Collections
open EnvDTE
open Microsoft.VisualStudio.TemplateWizard
open VSLangProj

[<AutoOpen>]
module TemplateWizardMod =
    let AddProjectReference (target:Option<Project>) (projToReference:Option<Project>) =
        if ((Option.isSome target) && (Option.isSome projToReference)) then
            let vsControllerProject = target.Value.Object :?> VSProject
            let existingProjectReference = 
                vsControllerProject.References.Find(projToReference.Value.Name) 
            if (existingProjectReference <> null) then existingProjectReference.Remove() 
            vsControllerProject.References.AddProject(projToReference.Value) |> ignore

    let BuildProjectMap (projectEnumerator:IEnumerator) =
        let rec buildProjects (projectMap:Map<string,Project>) = 
            match projectEnumerator.MoveNext() with
            | true -> let project = projectEnumerator.Current :?> Project
                      projectMap 
                      |> Map.add project.Name project
                      |> buildProjects 
            | _ -> projectMap
        buildProjects Map.empty

type TemplateWizard() =
    let projectRefs = [("Controllers", "Models"); ("Web", "Core")
                       ("Web", "Models"); ("Web", "Controllers")]
    [<DefaultValue>] val mutable Dte : DTE
    interface IWizard with
        member x.RunStarted (automationObject:Object, 
                             replacementsDictionary:Dictionary<string,string>, 
                             runKind:WizardRunKind, customParams:Object[]) =
            x.Dte <- automationObject :?> DTE
        member x.ProjectFinishedGenerating (project:Project) =
            try
                let projects = BuildProjectMap (x.Dte.Solution.Projects.GetEnumerator())
                projectRefs 
                |> Seq.iter (fun (target,source) ->
                             do AddProjectReference (projects.TryFind target) 
                                                    (projects.TryFind source))
            with 
            | _ -> "Do Nothing" |> ignore
        member x.ProjectItemFinishedGenerating projectItem = "Do Nothing" |> ignore
        member x.ShouldAddProjectItem filePath = true
        member x.BeforeOpeningFile projectItem = "Do Nothing" |> ignore
        member x.RunFinished() = "Do Nothing" |> ignore

2. Add references to EnvDTE.dll, Microsoft.VisualStudio.TemplateWizardInterface.dll, and VSLangProj.dll.

3. This assembly needs to be signed with a strong name, so add the "keyfile" switch to the "Other flags" field on the build properties for your F# template project and specify the location of your strongly named key file as shown below:

4. In the source.extension.vsixmanifest file of the VSIX project, add a new Content reference to the TemplateWizard project with a content type of Template Wizard as show here:


4. Add a WizardExtension section to your project collection .vstemplate file (named FSMVC3.vstemplate in the F# and C# ASP.NET MVC 3 Template)
 <WizardExtension>
   <Assembly>FSharpMVC3TemplateWizard, Version=0.0.0.0, Culture=neutral, PublicKeyToken=ba79043a32149735</Assembly>
   <FullClassName>FSharpMVC3TemplateWizard.TemplateWizard</FullClassName>
 </WizardExtension> 

5. Repackage your multi-project template as described in this post.

6. Build it, test it, and call it a day.

Where to go from here:

This simple edition to our template has solved the little problem that was previously experienced; however, we have only seen the tip of the iceberg when it comes to the power that is available to us through these template wizards. In a future post, I plan to explore these possibilities in greater details.

Thursday, March 3, 2011

Presentation: Building F# Visual Studio Application Templates

I had a fantastic time out in Redmond for the MVP Summit this year. It was great to see old friends and make many new ones. While there, I had the opportunity to speak during the MVP2MVP section of the event. The information and material for this talk is provided below.

Abstract:

Have you ever wondered how to write project templates similar to those that come out of the box in Visual Studio? In this talk we will discuss what goes into the creation of a multi-project template, how to package the template into a Visual Studio 2010 Extension file (VSIX), and how to best distribute your template to other developers. We will do this with an example of an F# multi-project template.

Slides:
Example:

The example that was used for the presentation can be found at https://github.com/dmohl/FSharpWP7BasicTemplate

Tuesday, February 22, 2011

Creating the FSPowerPack.Community NuGet Package

If you've been paying attention to NuGet over the last week (or have read my last post), you are likely aware that support for F# projects was included in the NuGet 1.1 RTM release. I'm hoping that this is the start to a significant increase in the number of F#-related packages available on the 
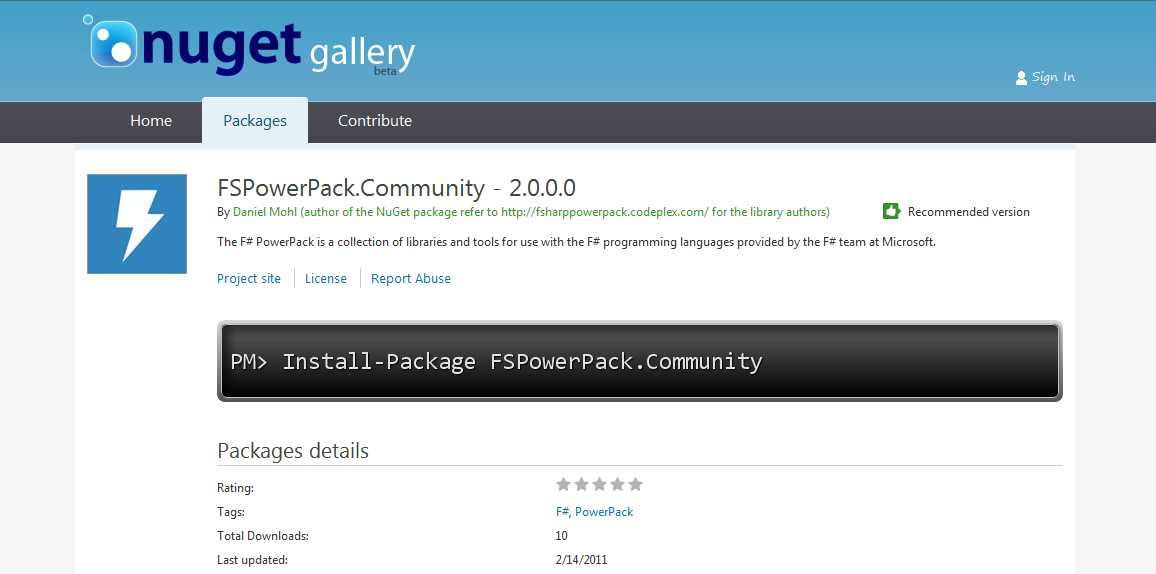
NuGet Gallery. With this goal in mind, I decided to post the steps that were taken to create the FSPowerPack.Community package along with a few helpful hints that may reduce some Googling as you go down the path of creating your first package.

Building the Package:

1. Create a metadata file called FSPowerPack.Community.nuspec to describe the package. The contents of this file are shown below:

<package xmlns:xsd="http://www.w3.org/2001/XMLSchema" xmlns:xsi="http://www.w3.org/2001/XMLSchema-instance">
  <metadata xmlns="http://schemas.microsoft.com/packaging/2010/07/nuspec.xsd">
    <id>FSPowerPack.Community</id>
    <version>2.0.0.0</version>
    <authors>Daniel Mohl (author of this NuGet package) refer to       http://fsharppowerpack.codeplex.com/ for the library authors</authors>
    <requirelicenseacceptance>true</requirelicenseacceptance>
    <description>The F# PowerPack is a collection of libraries and tools for use with the F# programming languages provided by the F# team at Microsoft.</description>
    <summary>
 The additional libraries in the F# PowerPack are functionality which is not part of the core F# release, but enables some development scenarios with F#. The PowerPack include features such as a basic Matrix library and supporting math types, FsLex and FsYacc tools for lexing and parsing, support for using F# with LINQ-based libraries, and a tool for generating HTML documentation from F# libraries. This functionality, which has previously been available in the F# CTP releases, is now available on CodePlex. The F# PowerPack will continue to evolve seperately from the main F# releases, and the features will continue to be improved and iterated upon. 
    </summary>
    <language>en-US</language>
    <projecturl>http://fsharppowerpack.codeplex.com/</projecturl>
    <licenseurl>http://fsharppowerpack.codeplex.com/license</licenseurl>
  </metadata>
  <files>
   <file src="Lib\*.*" target="Lib"/>
   <file src="Lib\Net20\*.*" target="Lib\Net20"/>
   <file src="Lib\Net40\*.*" target="Lib\Net40"/>
   <file src="Lib\sl3\*.*" target="Lib\sl3"/>
   <file src="Lib\sl4\*.*" target="Lib\sl4"/>
   <file src="Tools\*.*" target="Tools"/>
   <file src="Content\*.*" target="Content"/>
  </files>
</package>
The following list provides a little bit of additional information surrounding a few of the elements that may not be completely obviously during the initial viewing of the file.

id - The id element needs to match the package id that is or will be registered on the NuGet Gallery. It is the primary means by which users will locate and retrieve your package.
version - The version element defines the version of this particular configuration and is one of the keys that others can use to create dependencies on your package. Additionally, the NuGet Gallery will only allow uploads of the same package if the version has been modified.
files - This element should contain a file element for each directory and/or sub-directory that has content that should be included in the package.

2. Create the "Lib", "Content", and "Tools" directories in the same directory that contains the FSPowerPack.Community.nuspec file.

3. Place the files that you plan to distribute into these newly created directories. Information related to the types of files that each of these directories should contain is defined below:

Lib - Contains any libraries that will be added to the project as a reference. The Lib folder can contain sub-folders that allow targeting of specific frameworks such as Net11, Net20, Net40, sl3, and/or sl4. In the case of FSPowerPack.Community the appropriate framework DLLs were added to folders named Net20, Net40, sl3, and sl4.

Content - Contains any source files that you wish to add to the project during package installation. The source file names follow a convention of {file name}.{file extension}.pp. For the FSPowerPack.Community package, there is only one F# source file that should be included. It is named FSPowerPack_Example.fs.pp and the contents of the file are shown below (Note: This source code is from the F# PowerPack CodePlex page - http://fsharppowerpack.codeplex.com/):
module FSPowerPowerExample

open System

let v  = vector [1.0;1.0;1.0] + vector [2.0;2.0;2.0] // (3.0; 3.0; 3.0)
let c = complex 0.0 1.0 * complex 0.0 1.0 // -1r+0i
let r = (1N/2N) * (1N/3N) // 1/6
Tools - Contains any files that you wish to include with the package, but that should not be added as references to the project. This directory can also contain a few specially named PowerShell scripts (i.e. Init.ps1, Install.ps1, Uninstall.ps1) that provide hooks into the install/uninstall processes. In the case of FSPowerPack.Community, there wasn't a need to include any of the PowerShell scripts; however, several additional DLLs and EXEs were included that may be useful in various scenarios.

4. Create the nupkg file by running a command with the nuget.exe tool found at http://nuget.codeplex.com/releases/view/55760. The output file name follows the convention of {id from the nuspec file}{version from the nuspec file}.nupkg. The command used to create the FSPowerPack.Community.nupkg file was:

nuget.exe pack c:\git\FSPowerPack.Community\FSPowerPack.Community.nuspec -b c:\git\FSPowerPack.Community -o c:\git\FSPowerPack.Community

5. Test all scenarios locally (visit "Hosting Your Own Local and Remote NuPack Feeds" for information on how to setup a local feed)

6. If you don't have a NuGet gallery account, go to the nuget.org site and register. Follow the instructions in the confirmation email to be granted access as a contributor. Once you have an account, follow the process for uploading your *.nupkg file to the NuGet Gallery.

7. Test all scenarios once more with the NuGet Gallery as the source.

Conclusion:

This blog post walks you through the steps that were needed to create the FSPowerPack.Community NuGet Package. There are a number of additional options and featured available to a NuGet package author and new features/functionality are being added all of the time. Check out the NuGet CodePlex site (http://nuget.codeplex.com/) to find out more. Hopefully, this will give you the tools to start building your first F# NuGet package. I look forward to trying out your creation.

Thursday, February 17, 2011

F# PowerPack on the NuGet Gallery

A few days ago, the F# PowerPack was packaged up and uploaded to the NuGet Gallery.


For those who don't know, "the F# PowerPack are functionality which is not part of the core F# release, but enables some development scenarios with F#. The PowerPack include features such as a basic Matrix library and supporting math types, FsLex and FsYacc tools for lexing and parsing, support for using F# with LINQ-based libraries, and a tool for generating HTML documentation from F# libraries." (http://fsharppowerpack.codeplex.com/)

The FSPowerPack.Community NuGet Package provides a quick and easy way to get started with F# PowerPack in your project. To install the package, follow the instructions outlined here (using "FSPowerPack.Community" in place of "FsUnit"). The package installation process will retrieve all the associated files, add appropriate references, and add a F# source file with a few simple examples.

In a future post, I'll talk a little about how this NuGet package was created. If you can't wait, there are several places that have great information on creating NuGet packages such as Phil Haack's "Uploading Packages to the NuGet Gallery" postScott Hanselman's latest post, and the NuGet CodePlex site. You can also find all the files that I used to create this package on my GitHub.


Sunday, February 13, 2011

FsUnit Now On NuGet Gallery

FsUnit 0.9.0 is now available on NuGet Gallery.

FsUnit is a library that "makes unit testing with F# more enjoyable." (http://fsunit.codeplex.com/)

The version 0.9.0 of the FsUnit NuGet package pulls down NUnit and FsUnit 0.9.0, adds the appropriate references to the designated project, and puts in an fs source file with a simple example of a class and a few tests.

To get started using this package, you will first need to make sure that you have version 1.1 (which was released yesterday) or higher of the NuGet.Tools VS2010 extension. Once you have that, there are a couple of different ways to install the FsUnit package.

Option 1:

1. Create or open a F# project.
2. Open the Package Manage Console window (this can be found in Visual Studio 2010 under view -> Other Windows -> Package Manager Console).
3. In the Package Manager Console, type "Install-Package FsUnit".
4. Hit "Enter" and wait for several seconds until you see a few messages related to downloading and installing the package.

Option 2:

1. Create or open a F# project.
2. In the Solution Explorer, right click "References" and select "Add Library Package Reference...".
3. In the resulting window, select "Online" then search for "FsUnit".


 4. Click the Install button and wait for the installation to complete.