In my last post, I showed how to use F# in Google Colab via installation of .NET Interactive.
Today I'll walk you through how to wire up .NET Interactive within Google Cloud AI Platform Notebooks. AI Platform Notebooks provides secure, managed JupyterLab instances. This combined with .NET Interactive enables a first class experience in AI Platform Notebooks for F#, C#, and PowerShell.
Setting up GCP AI Platform Notebooks
1. Log into Google Cloud Console and open AI Platform (Unified)
2. Select Notebooks in the left nav
3. Create a new instance with Python 3 as the base.
4. Once the instance creation process finishes, click the OPEN JUPYTERLAB button.
5. Open a terminal from the Launcher.
6. In the terminal, run the following to install the .NET SDK:
7. Now install .NET Interactive with the following:
8. Close the terminal window and JupyterLabs.
9. In GCP AI Platform Notebooks, reset the instance.
Launching .NET Notebooks
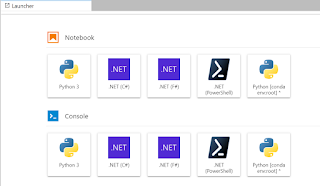
Now that the initial setup steps are complete, the launcher in JupyterLab will include F#, C#, and PowerShell notebook options.


No comments:
Post a Comment