Friday, March 5, 2021

.NET Interactive in GCP AI Platform Notebooks via a Container

In my last post, I showed how to setup F#, C#, and PowerShell within Google Cloud AI Platform Notebooks using a manual approach. Another option is to create a notebooks instance from a container that includes .NET Interactive pre-installed.

To accomplish this, do the following:

1. Enable applicable GCP APIs (Cloud Build, Artifact Registry, AI Platform Notebooks, etc.), if they are not already enabled.

2. Open the GCP Cloud Shell Terminal.

3. In Cloud Shell, create a file named Dockerfile (e.g. nano Dockerfile), copy/paste the following into the file, and save.

4. Build the container with a command such as the following (Note: Replace the “REPLACE_WITH_PROJECT_ID” placeholder with your GCP Project ID):

5. Create a new Notebooks instance via gcloud or the AI Platform Notebooks console. Note: Replace the “REPLACE_WITH_PROJECT_ID” placeholder with your GCP Project ID.

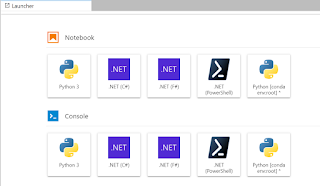
6. Once the notebook instance is created, open JupyterLab and F#, C#, & PowerShell options will be available.


Monday, February 15, 2021

F# on GCP AI Platform Notebooks

In my last post, I showed how to use F# in Google Colab via installation of .NET Interactive. 

Today I'll walk you through how to wire up .NET Interactive within Google Cloud AI Platform Notebooks. AI Platform Notebooks provides secure, managed JupyterLab instances. This combined with .NET Interactive enables a first class experience in AI Platform Notebooks for F#, C#, and PowerShell.

Setting up GCP AI Platform Notebooks

1. Log into Google Cloud Console and open AI Platform (Unified)

2. Select Notebooks in the left nav

3. Create a new instance with Python 3 as the base.


4. Once the instance creation process finishes, click the OPEN JUPYTERLAB button.


5. Open a terminal from the Launcher.


6. In the terminal, run the following to install the .NET SDK:

7. Now install .NET Interactive with the following:

8. Close the terminal window and JupyterLabs.

9. In GCP AI Platform Notebooks, reset the instance.


Launching .NET Notebooks

Now that the initial setup steps are complete, the launcher in JupyterLab will include F#, C#, and PowerShell notebook options.


A simple F# Notebook example is below:


Sunday, February 7, 2021

F# in Google Colab Notebooks

.NET Interactive

.NET Interactive is a tool provided by Microsoft which among other things makes it easy to use .NET (C#, F#, and PowerShell) in Jupyter Notebooks.

Google Colab

Google Colab is a free, cloud hosted Jupyter notebook environment that includes access to GPUs. The Colab environment provides kernels for R, Python 2, Python 3, and Swift by default.

F# on Colab

Colab doesn't currently offer a streamlined option for adding additional kernels. However, enabling .NET via .NET Interactive is relatively easy to accomplish.

1. In Colab upload an IPython Notebook (*.ipynb) file that includes the kernelspec set to ".net-fsharp"


2. Execute code to install the .NET SDK and .NET Interactive. Wait for all steps to complete. Note: A message will appear indicating that .net-fsharp is an unrecognized runtime. This can be ignored.

3. In the Colab File menu, select "Runtime" -> "Change runtime type" then "Save" on the resulting popup window.

4. You can now execute F# in new code cells. 


A Gist with the full example is below: