Back in March 2012, I announced that the F# Empty WPF project template had been enhanced to include a type provider from the FSharpx type providers collection. Today, another evolution of the F# Empty WPF template has occurred. The FSharpx.TypeProviders.Xaml type provider has been replaced with Reed Copsey's FsXaml for WPF type provider.
Building a Simple Example:
It's very easy to get started with the latest version of the template as well as FsXaml. Here the steps to create an overly simple example with the new version of the template, FxXaml and FSharp.ViewModule.Core (which is also inclueded in the template):
1. Create a new project with the latest version of the F# Empty Windows App (WPF) template.
2. Build the project and Enable the type provider when requested to do so. You can now run the project, which at this point simply displays a blank screen.
3. Open the MainWindow.xaml.fs file and replace the contents with the following:
4. Open the MainWindow.xaml file add the following to the Grid element:
After this change, the MainWindow.xaml file will look something like the following with one small different depending on what you named your project:
For additional examples checkout the demos in the FsXaml GitHub repo.
Sunday, November 30, 2014
Sunday, November 2, 2014
New Project Templates in the F# MVC 5 Package
There is a new version of the F# MVC 5 VSIX that contains two new templates (built by Ryan Riley) to get you started with web projects built on Owin and Katana: Web API 2.2 and Katana 3.0 and Web API 2.2 and Katana 3.0 (Empty).
To use these new templates, simply install the latest version of the package and create a new project.
To use these new templates, simply install the latest version of the package and create a new project.
Monday, July 14, 2014
Improvements to the F# Web Templates
There has been quite a bit of activity with various F# web templates over the last few months. This post will cover several of these activities.
ServiceStack Templates:
Kunjan Dalal and I have released version 2 of the ServiceStack templates. This version includes 4 new templates that target version 4 of ServiceStack. You can find the latest at http://visualstudiogallery.msdn.microsoft.com/278caff1-917a-4ac1-a552-e5a2ce0f6e1f.
MVC 5 Templates:
There are now 2 new "empty" templates available in the latest release of the package available at http://visualstudiogallery.msdn.microsoft.com/39ae8dec-d11a-4ac9-974e-be0fdadec71b. There have also been several fixes and enhancements provided by various members of the F# community.
- Patrick McDonald improved the default serialization of the MVC5 and Web API templates so that an "@" character is no not appended to the end of JSON property names.
- Functionality has been added to appropriately handle cancellation of a template creation request
- The necessary changes have been made to allow NuGet restore to work for projects created from this template
Web Item Templates:
Last but not least, the Web Item Templates have been enhanced to support Visual Studio Express 2013 for Web.
Monday, April 21, 2014
F# Support for Web Projects
In December of last year, I announced a few templates that made it easy to create pure-F# MVC 5 and Web API 2 projects in Visual Studio 2012 and 2013. In a parallel stream, the F# team was working closely with the F# community to improve the F# web development experience by adding features such as publish-to-web. It's exciting to see that this great work is now available as a Visual F# Tools Preview. You can read more about this at http://blogs.msdn.com/b/fsharpteam/archive/2014/04/06/towards-web-project-support-in-the-visual-f-tools.aspx. This, as well as the recent announcement regarding the acceptance of contributions to the Visual F# Tools, is a huge step forward in the evolution of web development with F#.
Thursday, April 10, 2014
TypeScript in First-Class F# Web Projects
I was recently asked about how best to use TypeScript within a pure F# web project. Currently, there are two steps that are needed to make this happen.
1. Add the TypeScript item template by downloading and installing the latest version of the F# Web Item Templates extension from http://visualstudiogallery.msdn.microsoft.com/f1dae7fe-1ecc-4f1b-86b5-32a2970d012a.
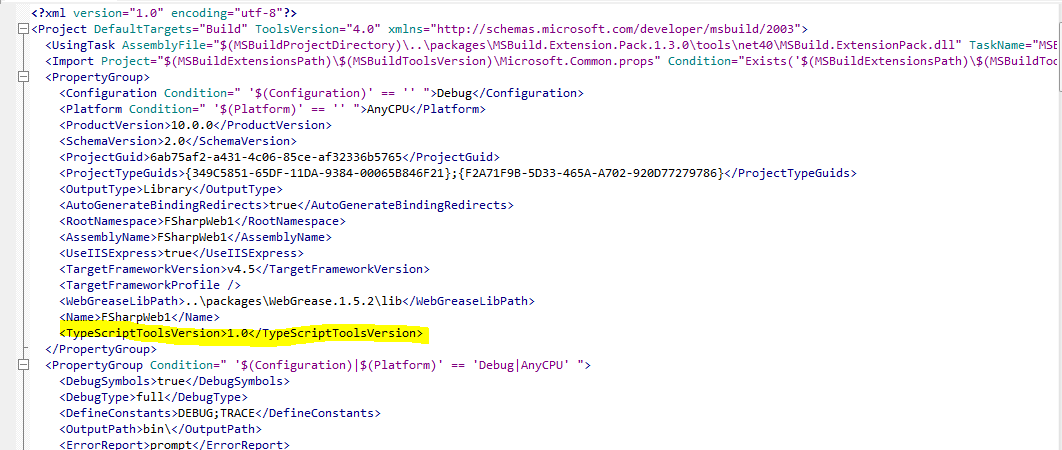
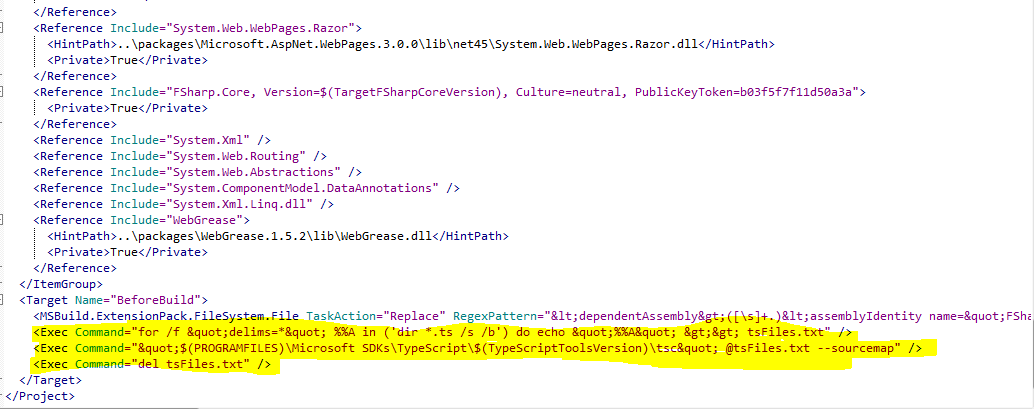
2. Modify your project file to allow the TypeScript files to compile to JavaScript when the project is compiled. To do this, you need to do the following:
- Edit your fsproj file.
- Add the TypeScriptToolsVersion element and specify the appropriate TypeScript version that you have installed.
- Add 3 new commands to the BeforeBuild target.
- Save and re-open your project. You should now be good to go.
I plan to work on a solution to reduce the pain of step 2 in the near future, so stay tuned...
Tuesday, February 4, 2014
Running D3 in Node.js on Windows without Python
If you do a quick search on running D3 in Node.js, several great examples show up. Once such example is http://mango-is.com/blog/engineering/pre-render-d3-js-charts-at-server-side.html. Unfortunately, the D3 NPM package has a dependency on the jsdom NPM package, which has a dependency on Contextify, which has a dependency on Python and C++. While this isn't that big of a deal, it does add some complexity to getting setup in a Windows environment. Luckily, there is an NPM package named jsdom-nogyp that removes the dependency on Contextify.
Here are the steps to get that previously mentioned example up and running with jsdom-nogyp:
1. Create a directory for your app and add the D3.min.js file to it.
2. Install the jsdom-nogyp NPM package with the command "npm install jsdom-nogyp".
3. Create a new file named test.js and add the following code within it. This code is basically a merge of the original example and the index.js file from the D3 code-base.
4. You can now run the test with the command "node test.js".
Monday, January 13, 2014
A Project Template Wizard Via NuGet
It's hard to believe that more than a month has gone by since the pure F# MVC 5/Web API 2 and pure F# Nancy templates were released. One of the known issues with these templates was that they didn't appear in the Visual Studio Online Templates search. I'm happy to say that this issue has been resolved.
The approach taken to address this issue involved a custom implementation of IWizard and a simple WPF dialog. While I've created several of these in the past, until now it never seemed practical to create anything that could easily be reused.
There is now a NuGet package with ID MultiProjectWizard that can be used to provide multiple templates in a single VSIX without having to give up Online Template search functionality. Here are the steps (Note: These steps assume that you are using SideWaffle, though this NuGet package has no dependency on SideWaffle):
1. Setup your solution as if it were a multi-project template by placing each template in it's own folder with the *.vstemplate file named as MyTemplate.vstemplate. Include an _definitions folder in the parent folder and create a <language>.vstemplate file within it. See https://github.com/fsharp/FSharpCommunityTemplates/tree/master/VisualStudio/Mvc5/TemplatePack/ProjectTemplates/Web for an example of how to setup the folder structure.
2. Make the XML in the _defintiions/<language>.vstemplate file similar to the following and update the TemplateData appropriately.
3.Update the WizardData/Projects child elements appropriately. Each element represents one of the templates that was included in it's own folder in step #1. Here's a description of the attributes for the ProjectInfo element:
4. Install the MultiProjectWizard NuGet package. Note: This package includes DLLs such as EnvDTE and EnvDTE80. If your project already includes these DLLs, then you may need to remove the duplicate References after installing this package.
5. Lastly, add the MultiProjectDialog.dll and MultiProjectTemplateWizard.dll files as Assets to the source.extension.manifest file (as an Assembly with "File on filesystem" as the source):
You can now try out your template. If all has gone well, you'll see a screen that looks something like this:
The approach taken to address this issue involved a custom implementation of IWizard and a simple WPF dialog. While I've created several of these in the past, until now it never seemed practical to create anything that could easily be reused.
There is now a NuGet package with ID MultiProjectWizard that can be used to provide multiple templates in a single VSIX without having to give up Online Template search functionality. Here are the steps (Note: These steps assume that you are using SideWaffle, though this NuGet package has no dependency on SideWaffle):
1. Setup your solution as if it were a multi-project template by placing each template in it's own folder with the *.vstemplate file named as MyTemplate.vstemplate. Include an _definitions folder in the parent folder and create a <language>.vstemplate file within it. See https://github.com/fsharp/FSharpCommunityTemplates/tree/master/VisualStudio/Mvc5/TemplatePack/ProjectTemplates/Web for an example of how to setup the folder structure.
2. Make the XML in the _defintiions/<language>.vstemplate file similar to the following and update the TemplateData appropriately.
3.Update the WizardData/Projects child elements appropriately. Each element represents one of the templates that was included in it's own folder in step #1. Here's a description of the attributes for the ProjectInfo element:
- folderName = This is the name of the folder created in step #1 that is associated with the template. The IWizard implementation will look into this folder and try to find a file with a name of MyTemplate.vstemplate.
- displayText = This is the text that will display in the WPF window for this particular template.
- icon = There are two options for icon: "FSharp" and "Generic". If you choose F#, then the icon for that template with include the text "F#", else it will not.
4. Install the MultiProjectWizard NuGet package. Note: This package includes DLLs such as EnvDTE and EnvDTE80. If your project already includes these DLLs, then you may need to remove the duplicate References after installing this package.
5. Lastly, add the MultiProjectDialog.dll and MultiProjectTemplateWizard.dll files as Assets to the source.extension.manifest file (as an Assembly with "File on filesystem" as the source):
You can now try out your template. If all has gone well, you'll see a screen that looks something like this:
Subscribe to:
Comments (Atom)


